Knowbler-Salesforce: Configuration in Knowbler
The first step in creating a knowledge article with Knowbler is to link your Salesforce org to Knowbler and map case fields to knowledge articles for auto-populating article drafts. This guide covers both linking and mapping processes.
Prerequisites
-
Ensure each agent using Knowbler is a Knowledge User in Salesforce. Refer to the official Salesforce documentation Lightning Knowledge User Access
-
Enable Lightning Knowledge. Follow the official Salesforce guide: Enable Lightning Knowledge.
-
Create at least one Record Type in the Knowledge object.
Add Connection
Knowbler uses a password management system to simplify authorization. This system securely stores passwords linked to your Salesforce orgs. It is recommended to store the passwords first to streamline the configuration process.
-
Log into Knowbler.
-
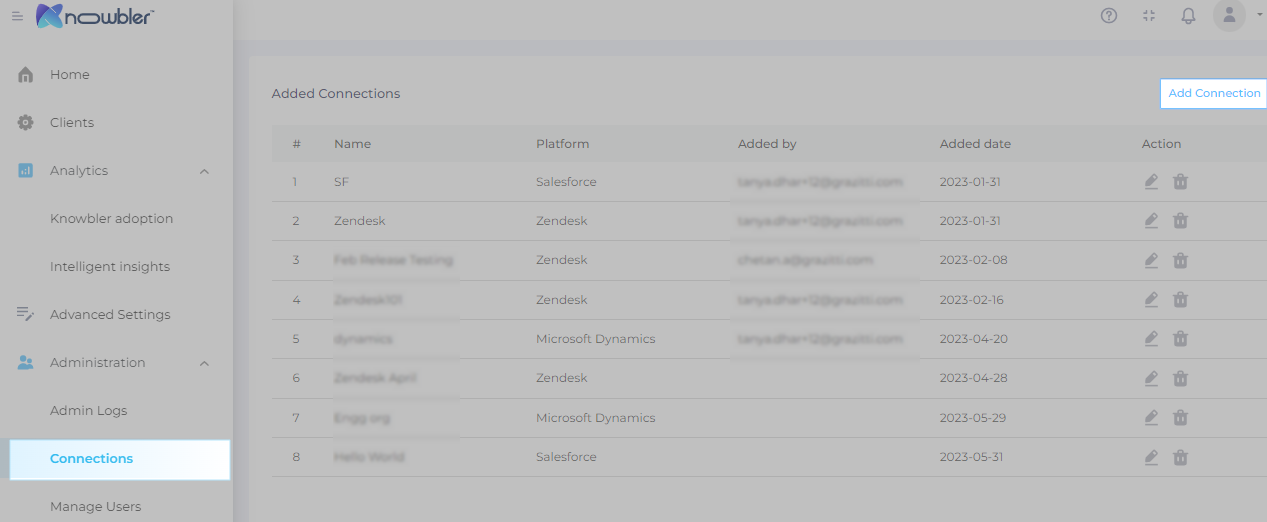
Go to Administration, open Connection, and click Add Connection.
-
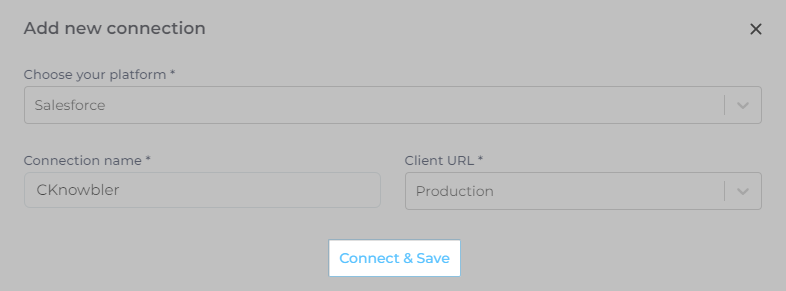
Salesforce is selected by default in Choose Your Platform.
-
Enter a descriptive label in Connection Name. Labels help distinguish between multiple stored credentials.
-
Select Production or Sandbox in the Client URL field.
-
Click Connect & Save.
-
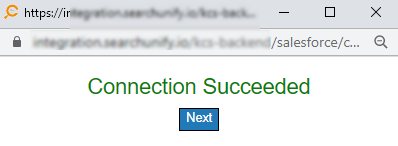
A pop-up window is displayed. If you are not already logged into Salesforce in another tab, log in to your org and allow SearchUnify to connect.
-
Once linking is successful, a "Connection Succeeded" message will be displayed. Click Next.
Your saved Connection will now appear under Added Connections.
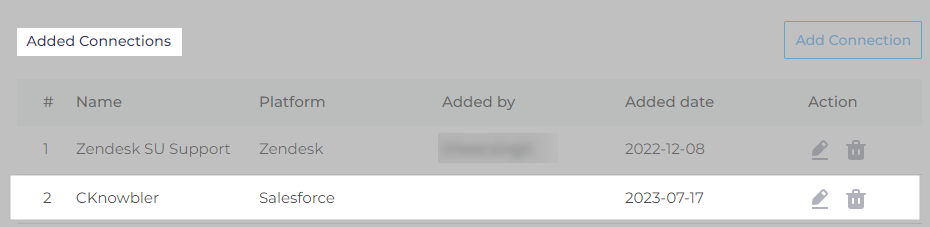
Fig. A snapshot of the Added Connections screen.
Use the Edit ( ) and Delete (
 ) buttons in the Action column to edit or delete stored credentials. Editing is necessary if your login credentials change.
NOTE.
Editing a connection impacts mapping. If you update a Connection, ensure you review and update the mapping as needed.

Fig. A snapshot of an error on the Added Connections screen.
Configure Service Desk and Knowledge Management Tool
Two terms are used multiple times in this section: Service Desk and Knowledge Management Tool.
A Service Desk is where support agents work and resolve cases. In comparison, a Knowledge Management Tool is where support articles are drafted and published. Salesforce fulfills both functions, so it acts as both a Service Desk and a Knowledge Management Tool.
-
Log into Knowbler.
-
Go to Clients, and click Add Client.
NOTE. First time users can use Get Started.

-
Select Salesforce.
-
Knowbler can be configured for multiple service desks. Each service desk has a unique name inside the app. Give your service desk a descriptive label in Name.
-
Under Connection, select the Connection added in the previous section.
NOTE. If you haven't added a Connection, click Add New and follow the instructions from the previous section.
-
Click Next.

Fig. A snapshot of the Choose Service Desk Management Tool screen.
-
Give your Knowledge Management System a label in Name and click Next.
NOTE. Next remains disabled until data has been entered in both fields—Name and Connection—and a link between Knowbler and Salesforce has been successfully established.

Fig. A snapshot of the Choose Knowledge Management System screen.
You will now land on the mapping screen. Enter knowledge__kav in the Object API field. Two configurations can now be seen:
-
Article Sharing Settings: This is used to configure public article URLs. What appears in the public URLs is set here.
-
Field Mapping: This is used to map article fields to either a custom template or a Master template in your Salesforce org.
If you encounter an error at this stage, return to the Prerequisites section and ensure all conditions have been fulfilled. It is especially important to create at least one Record Type in the Knowledge object.
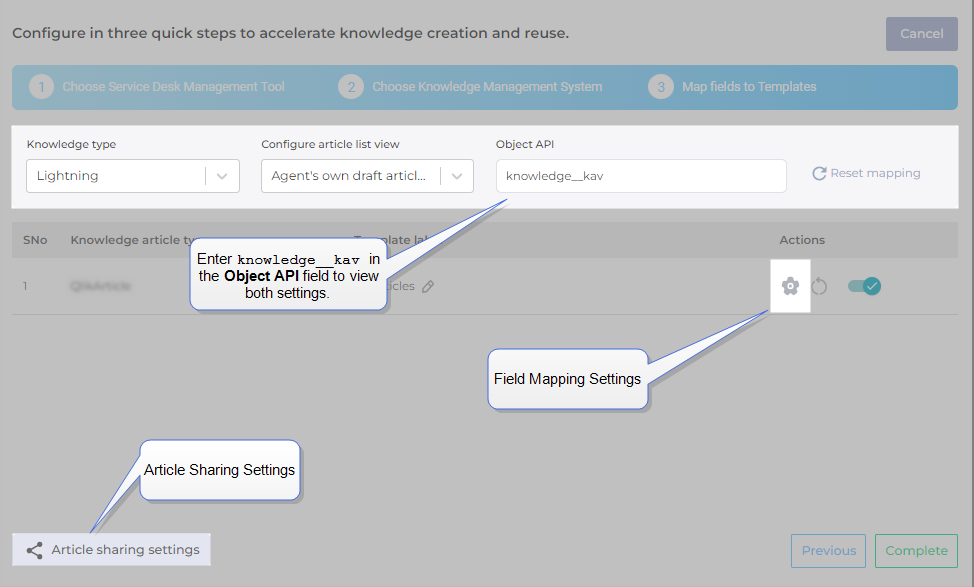
Fig. A snapshot of the Map Fields to Template screen.
Article Sharing Settings
NOTE.
Without this configuration, articles cannot be shared with customers through a public URL.
Articles stored in Salesforce Knowledge have static public URLs in the following format:
https://example.lightning.force.com/lightning/articles/Knowledge/{{custom}}. Through Article Sharing Settings, admins can configure the data that appears in the last part of the URL, {{custom}}.
For example, if an admin maps the title field to the {{custom}} field, the new public URL format will be:
https://example.lightning.force.com/lightning/articles/Knowledge/titleTo get started, click Article Sharing Settings.
The first setting is Reference or Resolution (Article Type Input). It is inactive by default. When activated, the agent composing an article in Knowbler receives a pop-up every time they share an article. The pop-up asks whether the article is a reference or a resolution. Turning this setting on is optional.
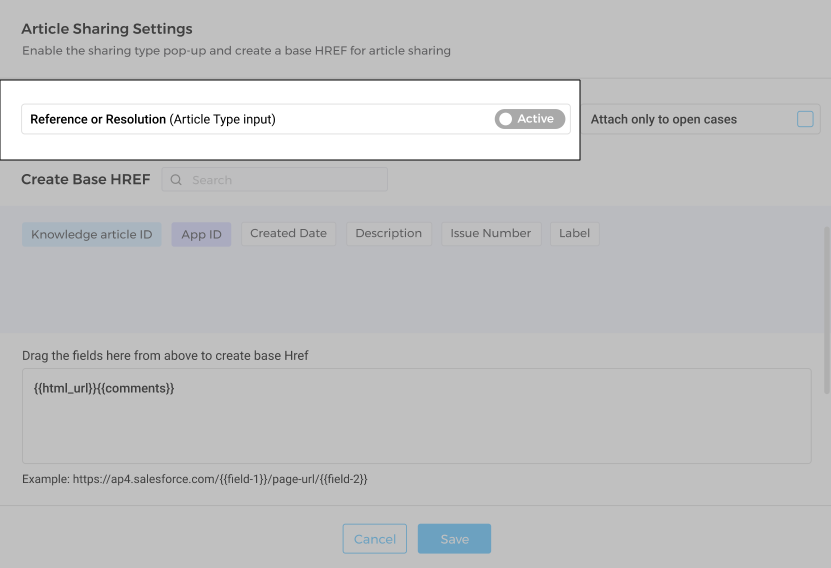
Fig. A snapshot of the Article Sharing Settings screen.
Next, the configuration Attach Only to Open Cases is available. By default, agents can link cases to both open and closed cases. If you want agents to link cases only to open cases, check this option.
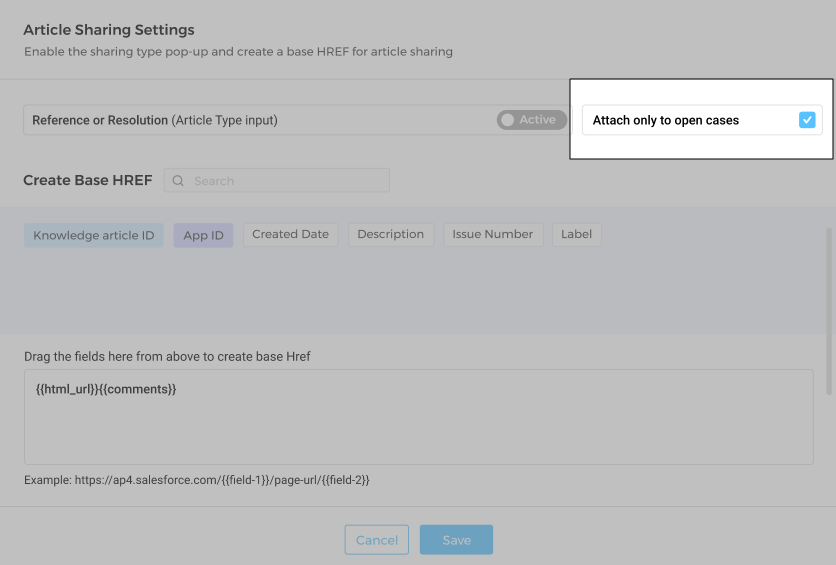
Fig. A snapshot of the Article Sharing Settings screen.
Create Base HREF includes all the article fields in a gray box. Drag the desired fields into the white box below to create a public URL. Everything placed in the white box is included in {{custom}}. Based on the fields selected in the image, the new URL will be:
https://example.lightning.force.com/lightning/articles/Knowledge/id-comments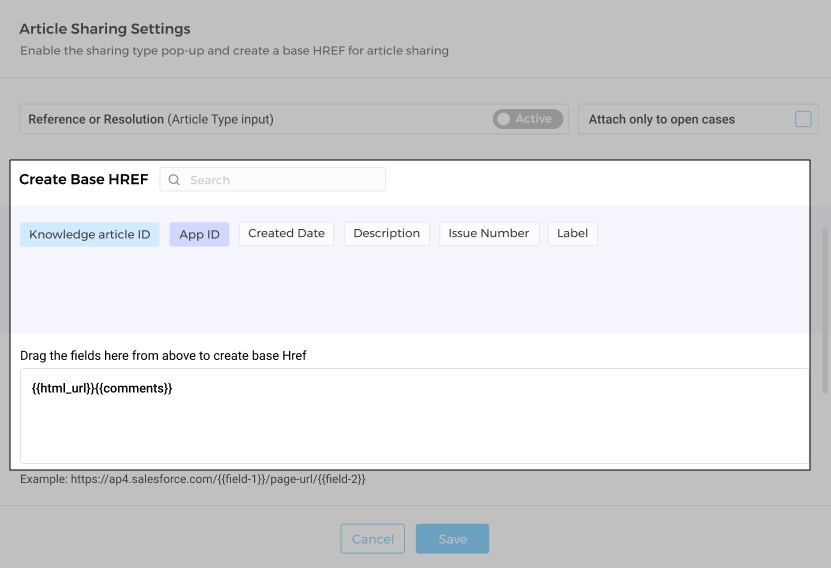
Fig. A snapshot of the Article Sharing Settings screen.
In many teams, agents do not have publishing rights. After writing an article, they can either save it as a draft or send it for review. The content reviewer then publishes the articles. In this workflow, agents must keep track of articles and attach them to the case once they are published. This process is not foolproof, and some articles may be created and published but never shared with the customer.
The Automatically Attach Articles to Original Cases When Published option ensures that such gaps are prevented. When checked, articles are automatically attached to the cases for which they were created.
If the Attach to Case option is inactive in the agent's Salesforce org, the published articles will be Linked as Case Comment.
If neither Attach to Case nor Linked as Case Comment are active, the published articles will be shared with the customer via email.
Finally, click Save to complete the configuration.
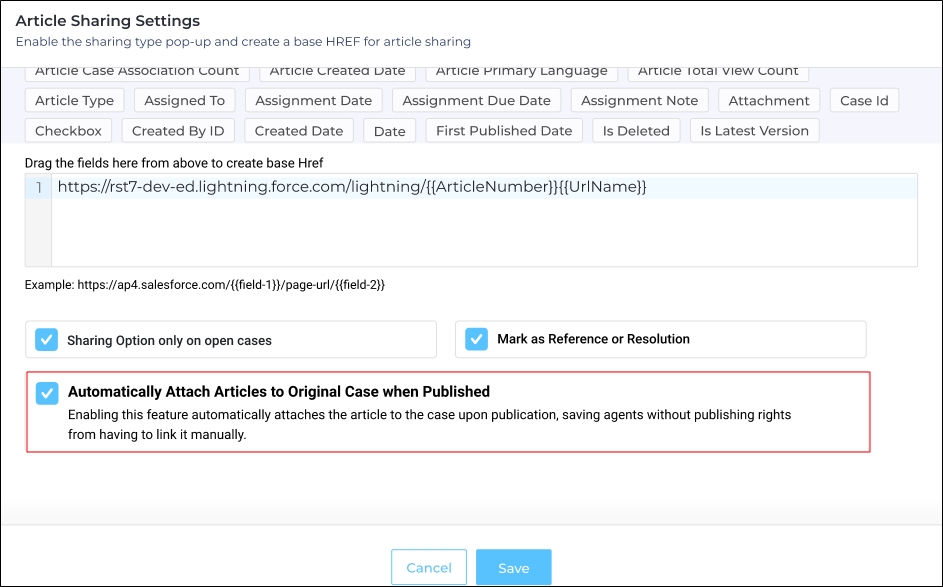
Fig. A snapshot of the Article Sharing Settings screen.
Map Fields
The key advantage of Knowbler is that it provides support agents with a template for writing support articles.
You can think of a template as a form with fields to be filled out. The fields can include Article Title, Article Body, and Article Category, among others. Data from Salesforce can be pulled into each article field.
For example, the Article Title can be pulled from the Case Subject, and the Article Body can be pulled from the Case Description.
NOTE.
For Knowbler to function, map essential fields like Title, URL and others specific to your organization.
In Mapping, an admin creates a template, adds fields, and configures the data sources for those fields. Successful mapping ensures that agents get the right data to draft their articles.
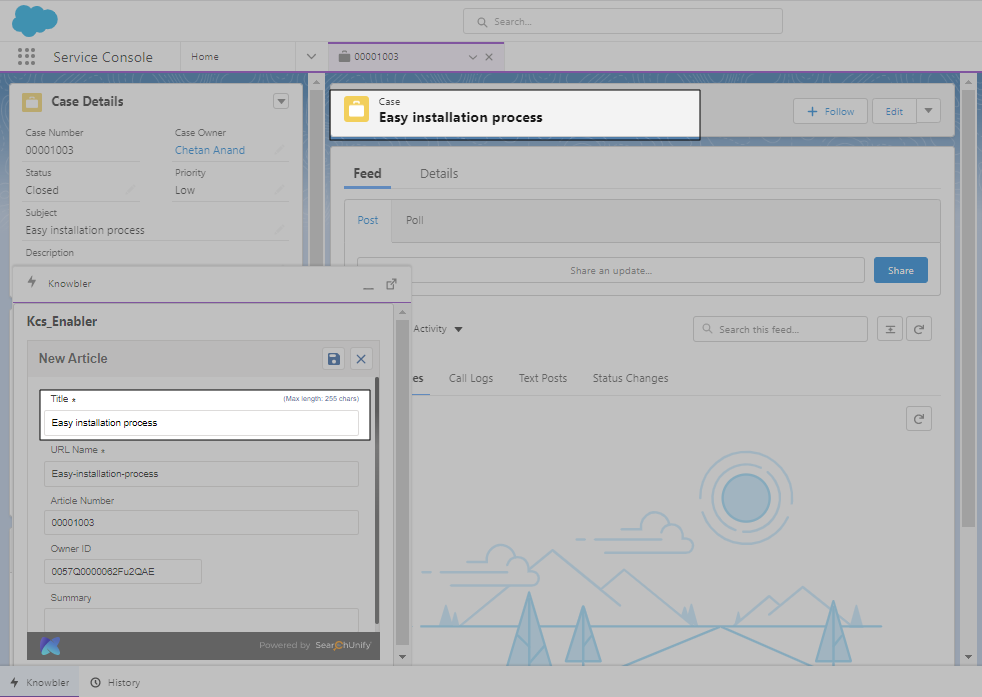
Fig. The Case Subject "Easy installation process" has been imported into the Article Title field.
After making changes in the mapped data fields, agents can send an article for review. A well-crafted template simplifies knowledge production.
This section explains how to map fields from a Salesforce case into an article. Admins can create multiple templates if needed.
NOTE.
Knowbler supports custom templates in Knowledge.
If you don’t have a custom template in your org, you can use the Master Template. The essential fields in the Master Template—required for creating an article in Knowledge—are mapped by default, though you can add additional fields.
You can use either the Master Template or custom templates from Salesforce, but not both.
-
Lightning is already selected in Knowledge Type and this value cannot be changed because Salesforce Classic isn't support.
-
Configure visibility settings in Configure Article List View. Two options are available:
-
All Draft Articles. All agents can view one another's drafts.
-
Agent's Own Draft Articles. An agent can only view the articles they have drafted.
-
-
knowledge__kav is automatically inserted into the Object API field.

-
Click the settings (
 ) icon to open the mapping screen.
-
A window opens showing knowledge__kav fields on the left and a section called Field Mapping on the right. To create a template, drag knowledge__kav fields into the Field Mapping section.

Each field in the template has up to four properties:
-
Name. The field name in Salesforce, such as Language.
-
Label. The name that support reps see. In the image below, the Name and Label are both Language.
-
Value. The data pulled into the template. You can map multiple case fields to a single article field.
For example, the Attachment field value in the image below is empty because it is case-dependent. For Language, the value is 'en_US', indicating that all Knowledge articles are in English.
-
Section. This can be either Create Article for fields like tags and descriptions, or Access Control and Other Settings for fields like visibility permissions.
-
Through the Action field, you can configure or delete a field.

When you edit, the dialog that opens is similar to the one that opens when you drag a field. The dialog varies with the fields. Here are the dialogues for the fields:
Attachment
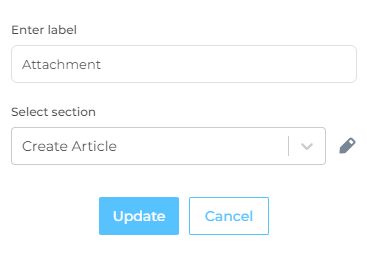
Fig. A snapshot of the dialog where the Attachment field is being mapped.
Language
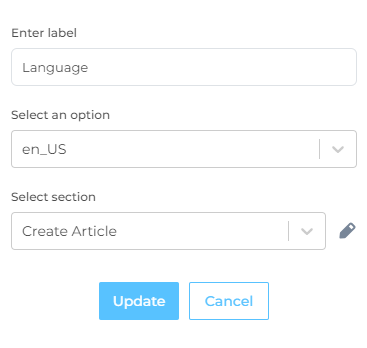
Fig. A snapshot of the dialog where the Language field is being mapped.
Picklist
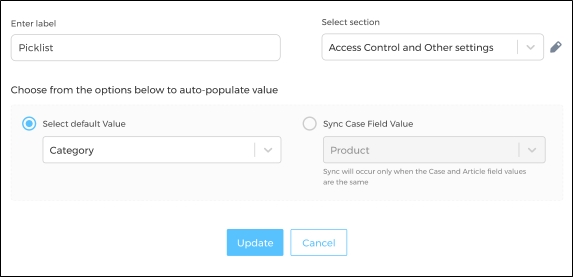
Fig. A snapshot of the dialog where the Picklist field is being mapped.
The admins have the following options:
-
Select Default Value: The default picklist value is copied to the article. For example, if the picklist field "Product" contains the values "SearchUnify," "Knowbler," and "SUVA," and the default value is set to "Knowbler," the value "Knowbler" will always be inserted into the knowledge article.
-
Sync Case Field Value: The value stored in the case picklist field is copied to the article. For instance, if the picklist field "Product" contains the values "SearchUnify," "Knowbler," and "SUVA," the value stored in the field (which can be SearchUnify, Knowbler or SUVA) will be inserted into the knowledge article.
Regardless of the option selected by the admin, the dependent picklist values are automatically synchronized and the synchronization applies to both custom and standard Salesforce fields.
If a picklist case field is deleted from the case:
-
The deleted case fields will appear as blanks in articles.
-
An error message will be displayed on the admin panel.
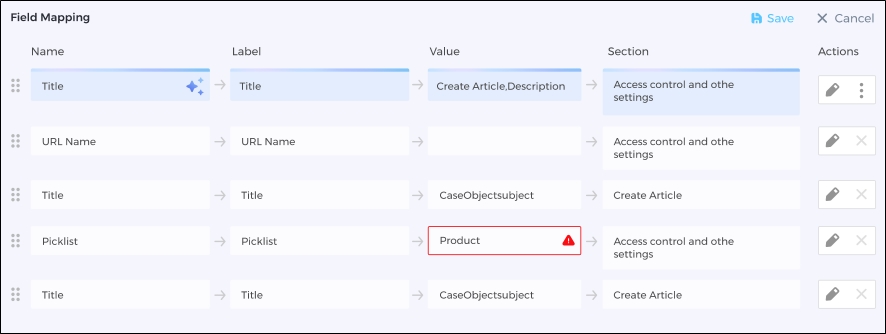
Fig. A snapshot of an error in the Admin Panel when a Picklist field is deleted from the record type.
URLName
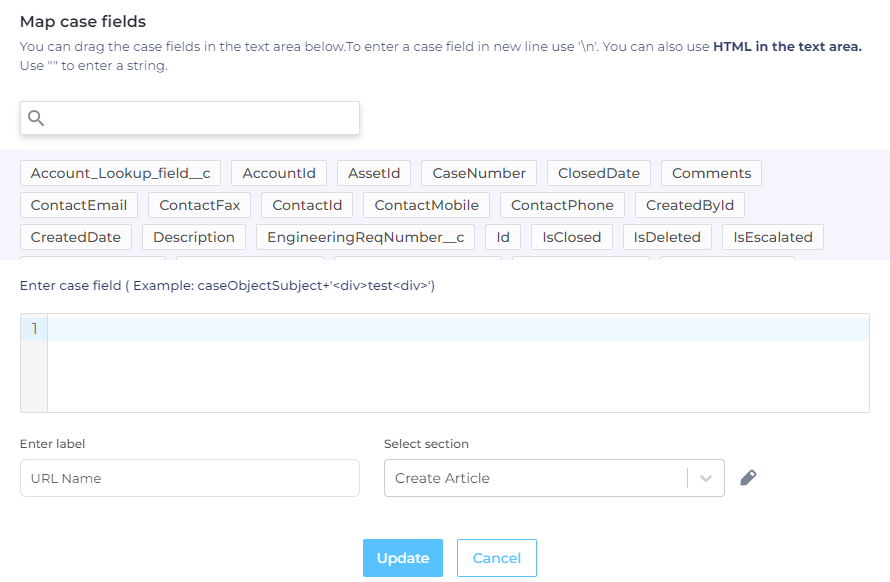
Fig. A snapshot of the dialog where the URLName field is being mapped.
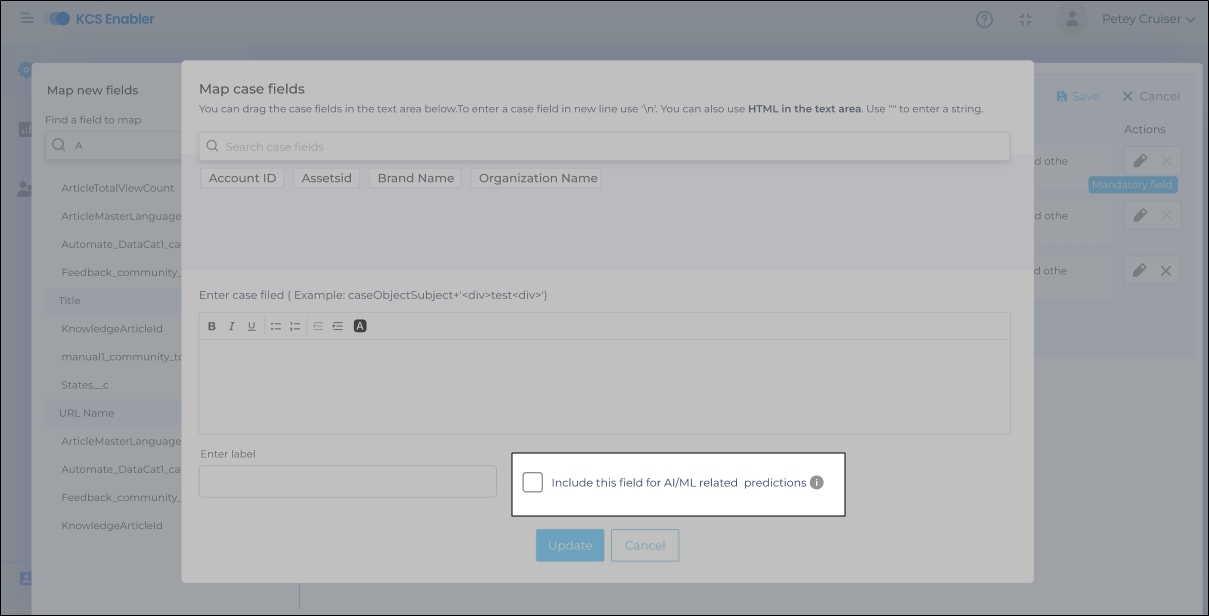
-
-
An Include the field for AI/ML Predictions field shows up on the Map Case Fields screen for text fields. When an admin checks the field, then Convent Reviewers can see Content Health score. The score is produced after an analysis of the data stored in the checked fields.
To show Content Health Score to the agents working in Salesforce, check Preview Article Content Health in Advanced Settings. More information is on Configure Advanced Settings in Knowbler.
-
Drag all fields except Title and, if the Knowbler-liked LLM is active, Summary. Both are covered in the next section.
Auto-Generation and Mapping
Besides mapping, admins can use LLMs on text, text area, and rich text fields to generate knowledge article content. This second method works when Knowbler is integrated with an LLM. To learn how to connect with an LLM, check outConfigure LLM Integration
Auto-Generate works on :
-
Title field
-
Text fields
-
Text area fields
-
Rich text fields: This field supports sectioning; more information is available in the sections “Auto-Generate Text, Text Area, and Rich Text Fields”.
Auto-Generate the Title Field
To auto-generate a title, drag the title field to the Title row, and complete the following steps:
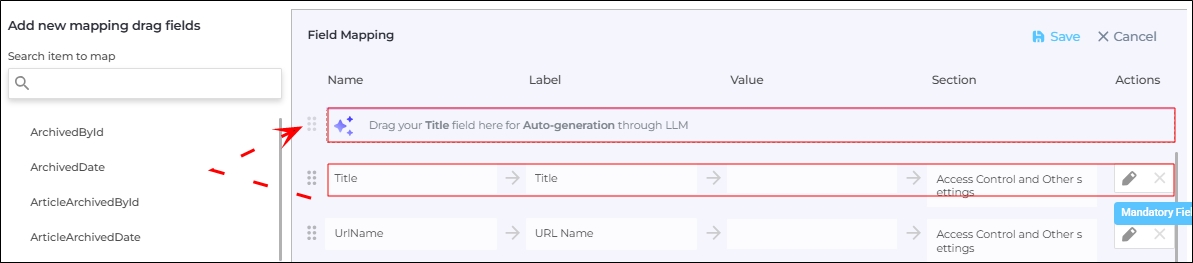
Fig. A snapshot of the Title field being dragged for auto generation.
-
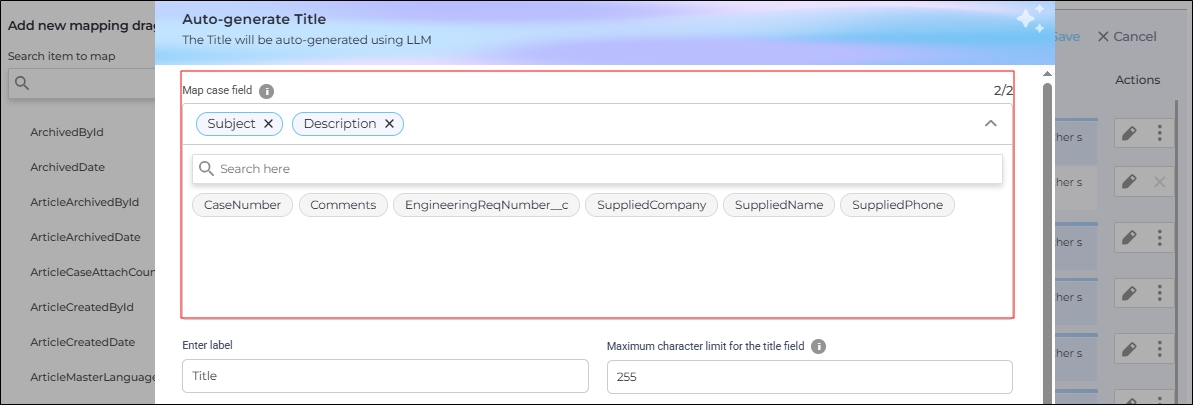
Use the search function to find fields and click on a field to select it. The selected fields are moved up and highlighted with a blue border. In the next image, Subject and Description are the selected fields.
You can select up to two case fields. The LLM uses data from selected fields to create a title. All text, text area, and rich text fields in standard and custom Salesforce objects are supported.
-
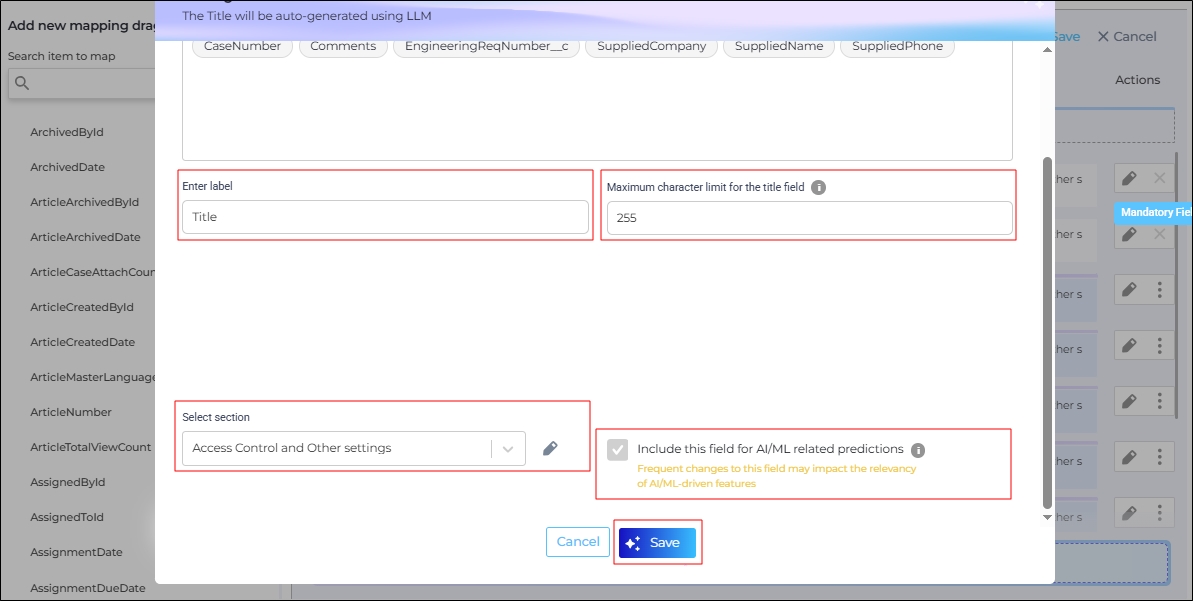
In Enter Label, specify an alternative name for the title (e.g., "Heading" or "Article Name") to ensure front-end consistency.
-
Select the Maximum character limit for the title field. The default limit is based on the Salesforce field limit. For example, if the limit for a field in Salesforce is 3200 characters, the maximum character limit for that field in Knowbler will also be 3200 characters. The admins can decrease the maximum character limit, but not increase it.
-
Select between Create Article (for fields like tags and descriptions) or Access Control and Other Settings (for access-control fields like visibility permissions).
-
The field Include the field for AI/ML Predictions field displays the Map Case Fields screen for text fields. It is checked by default. The value in the title field is used to calculate the Content Health Score.
-
Click Save.
Auto-Generate Text, Text Area, and Rich Text Fields
Starting from Q2 '25, admins can use Auto-Generate on all text, text area, and rich text fields. In the previous releases this functionality was limited to the Summary field.
Auto-Generate on the text, text area, and rich text fields works exactly as it does for the Title field, except for the three differences listed below:
-
The fields for auto-generation are in the Search item to map list. Click on a field and move it to the Drag any field here (except the title field) for Auto- generation using the LLM tab.
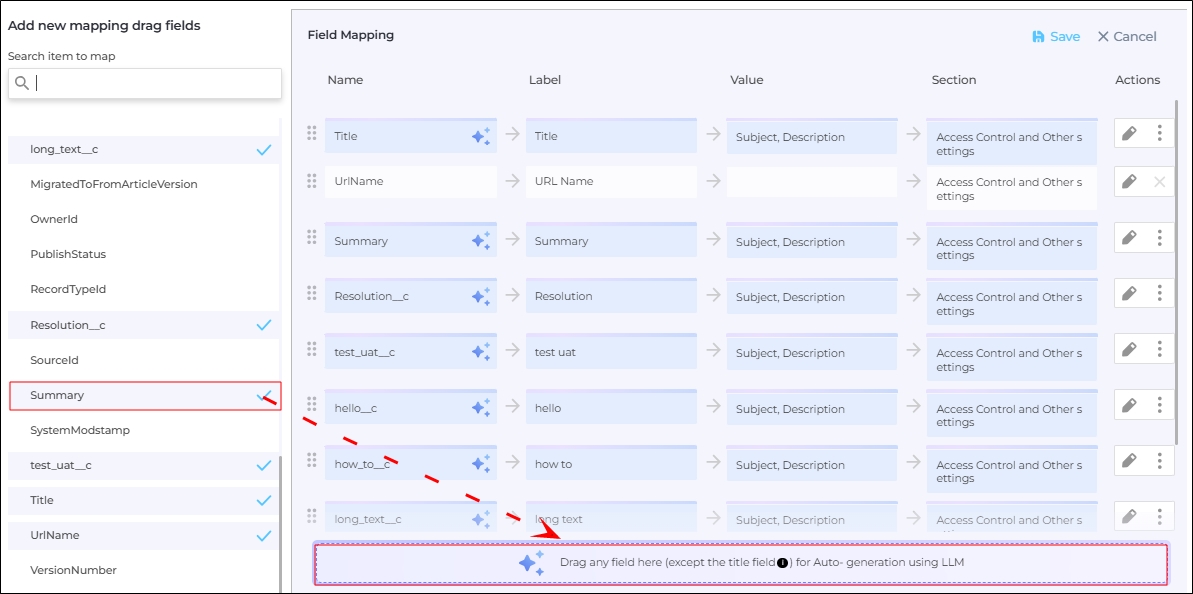
Fig. A snapshot of the Summary field being dragged for auto-generation.
-
You can auto-generate content by selecting up to five fields using the Map Case Field function. The more the fields you drag, the better the LLM-generated content will be.
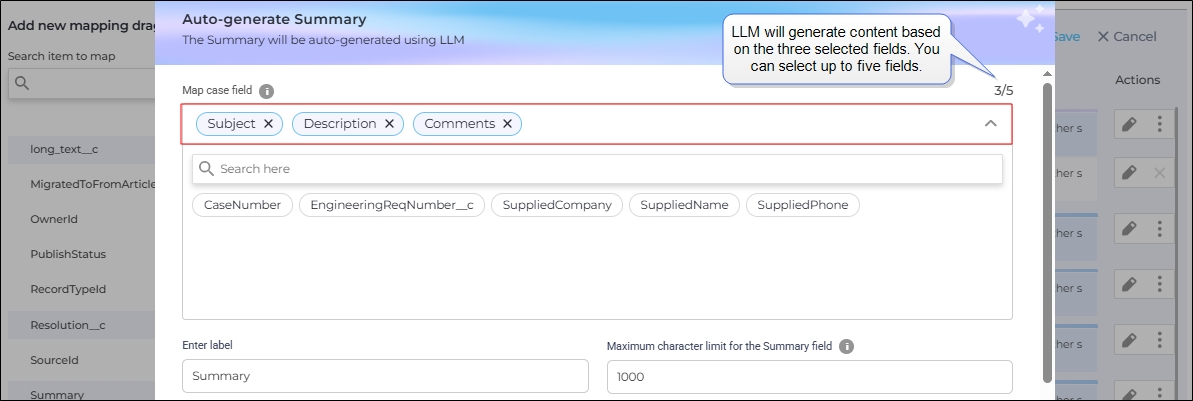
Fig. A snapshot of the Summary field which will be auto-generated based on the text stored in the fields Subject, Description, and Comments.
-
Sectioning is supported only in the rich text fields. Using sectioning, you can present the generated content in several parts instead of a monolith of text. In the next image, two sections have been created: Root Cause and Steps to Resolve.
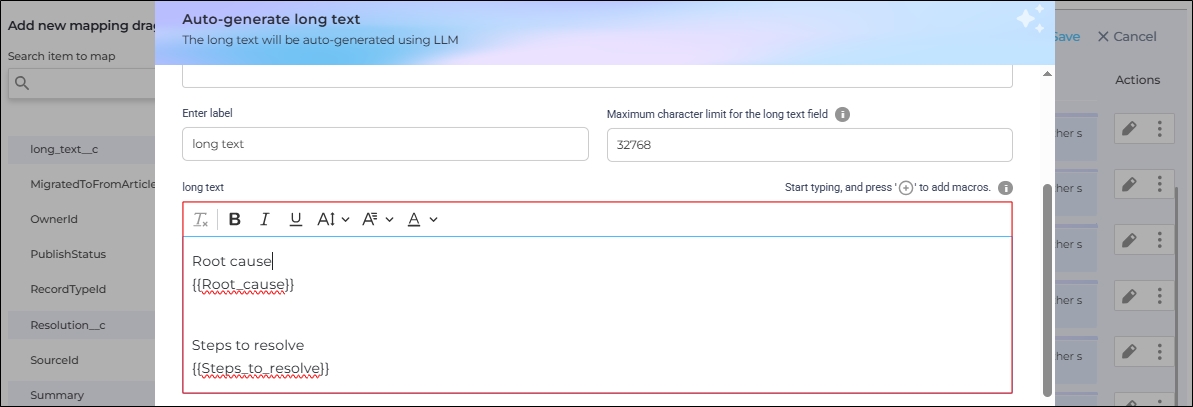
The instructions in the image above will generate a text divided into two sections:
-
In the first part, there will be the root cause of the issue. The "Root Cause" is for the end users who will see this section name. The text in curly brackets, {{root_cause}}, is for the LLMs. The users won't see the text in the curly brackets. Instead, the text in the curly brackets is replaced by the reason for that case.
-
In the second part there will be steps to resolve the issue. The “Step to Resolve" is for the end users who will see this section name. The text in curly brackets, {{steps_to_resolve}}, is for the LLMs. The users won't see the text in the curly brackets. Instead, the text in the curly brackets is replaced by the resolution for that case.
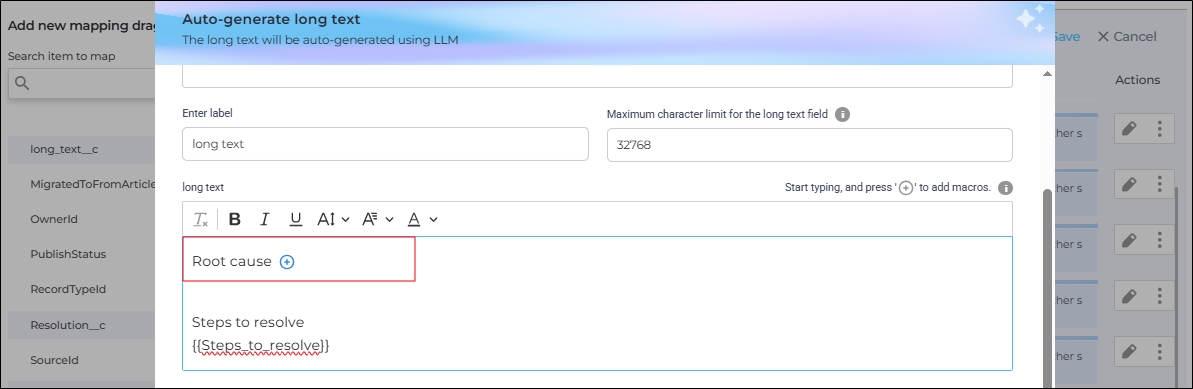
To create a section in curly brackets, click on the plus icon after writing a headline.
-
Admins can check or uncheck Include the field for AI/ML. When checked, the value stored in the field is used for calculating Content Health Score. For the Title field, admins cannot uncheck Include the field for AI/ML, but for all the other fields they can.
-
All the auto-generated fields are highlighted in blue.
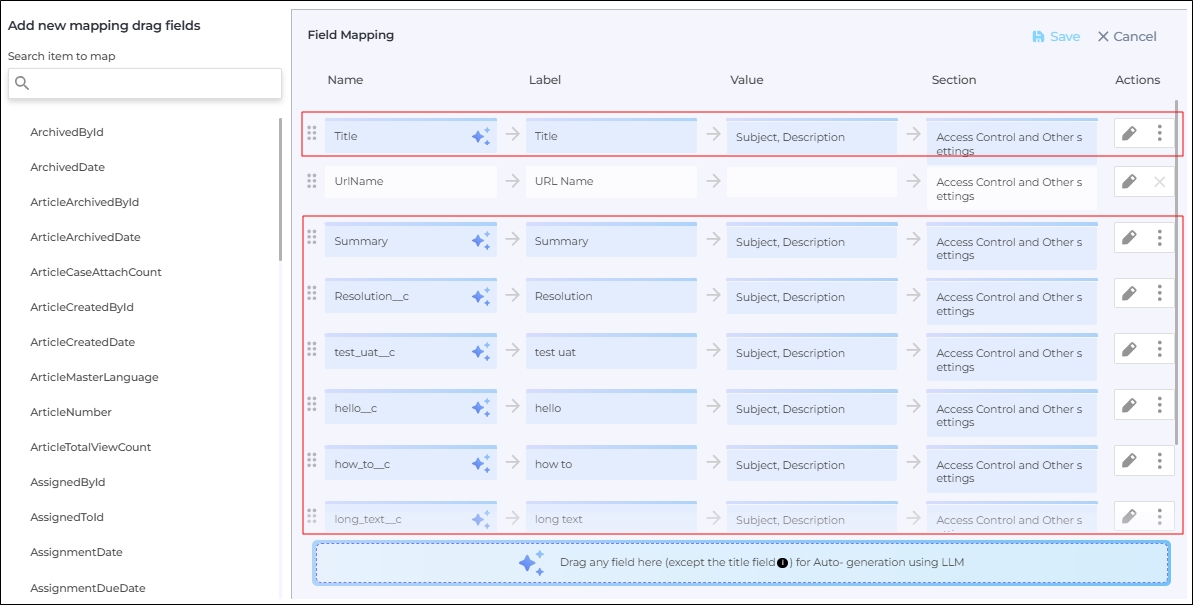
Fig. A snapshot of the fields configured for auto-generation.
Admins can remove auto-generation on any field by clicking Remove Auto-generation. When Auto-Generate is deactivated, then the fields used for generating the text have to be mapped again.
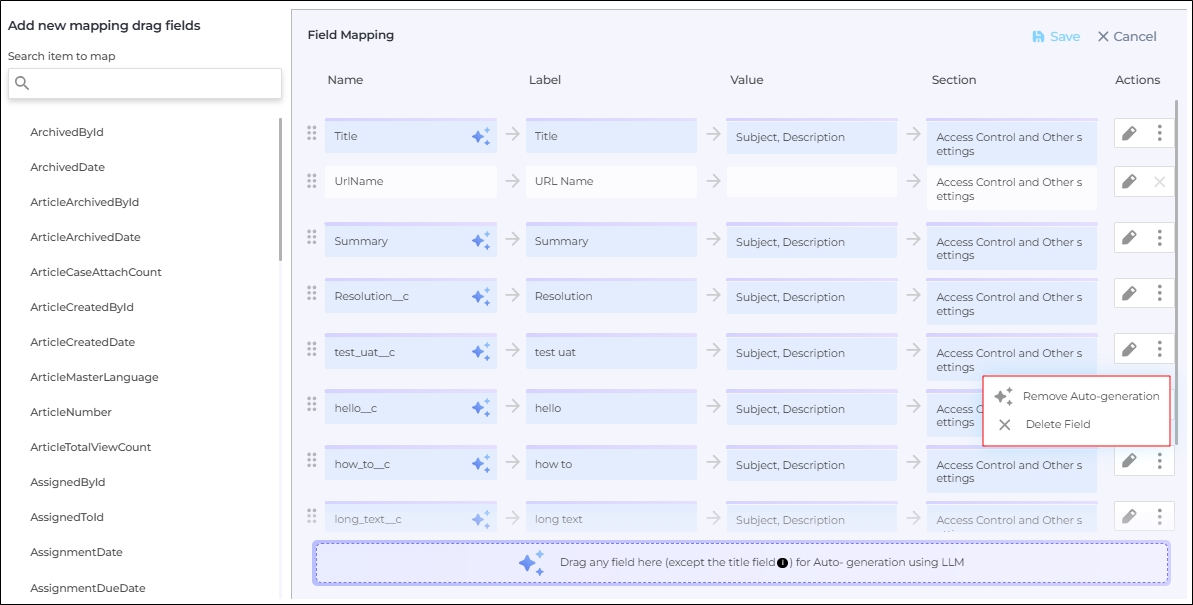
Fig. A snapshot of the Remove Auto-generation button.
Activation
Once all fields, including Title and Summary, have been mapped in the template:
-
Navigate to Map Fields to Templates and activate the template.
-
Click Complete to finalize the process.
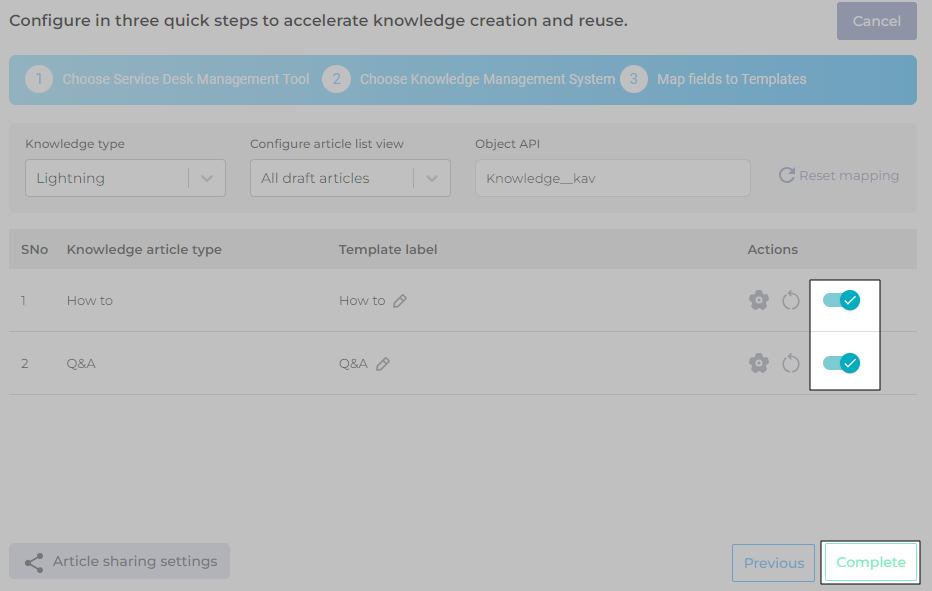
Fig. A snapshot of the Map Fields to Templates screen.
Next, proceed to Your Knowbler Clients and activate the client.
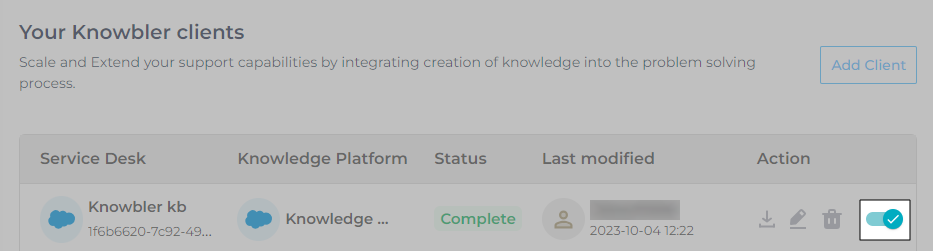
Fig. A snapshot of the Your Knowbler Clients screen.
Activate Knowbler for Support Agents
After completing the configuration of Knowbler, ensure that support agents can access it in their Salesforce organization by following these steps:
-
Download and install the Knowbler app from AppExchange.
-
Set up two remote sites to enable data sharing between Knowbler and SearchUnify.
-
Verify that both you and the support agents are knowledge users, as the app is only visible to the knowledge users.
For detailed instructions, refer to the article Install Knowbler in Salesforce.